WordPress Custom Theme – Template Files

In the last segment on WordPress custom theme structure, we outlined the essential files you’ll need for building a WordPress custom theme. In this tutorial I will show you how to build your first theme step by step.

The first thing you’ll want to do is set up a local install of WordPress. This will allow us to work much faster. You also don’t want to do this on a live website as things can break.

After you’ve setup WordPress and have everything working, we are ready to begin building our first WordPress custom theme. I want to build something very simple and elegant so we’re going to call our first theme “miniml”. Note the intentional misspelling.

So the first thing to do is to navigate to the WordPress install, go into the wp-content->themes folder. Lets create a new folder called “miniml”. If you are using a code editor like TextMate, Dreamweaver, BBEdit or Coda – this is a good time to set that folder up into your working environment to easily create files. In the screenshots that follow, I’m using TextMate set up this way. This folder is where all of the files for our WordPress custom theme will live.

1) Create the styles.css file

Lets create the styles.css file that tells WordPress about our new theme. Create the file and paste in the following code including the slashes and asterisk characters:


/*
Theme Name:
Theme URI:
Author:
Author URI:
Description:
Version:
*/

Fill this information out so WordPress will know your theme exists and what to call it. URI’s are links to author pages and WordPress custom theme pages if you have one set up. I don’t right now so I’m going to fill mine out like this:


/*
Theme Name: miniml
Theme URI: http://tedforbes.com
Author: Ted Forbes
Author URI: http://tedforbes.com
Description: My first WordPress theme!
Version: 1.0
*/

Later as we design our website, we will put CSS code into this stylesheet, but we don’t have a site yet so we’ll come back to this later.

Build the Template

Go ahead and create another new file. Save this in our template folder and name it index.php – we now have a stylesheet and a template file. If you navigate in your browser to wp-admin->appearance->themes you will now see our new theme listed! However we haven’t put any code in here yet so if you activate the theme it will just be blank. So we’ll need to start putting some code in our files to make the theme work.

WordPress Custom Theme – the index.php file

Lets open our empty index.php file and write some code. For now, go ahead and lets do an html5 skeleton. Place the following code into the document:


<!DOCTYPE html>
<html dir="ltr" lang="en-US">
<head>
<meta charset="UTF-8" />
<title></title>
<link rel="profile" href="http://gmpg.org/xfn/11" />
</head>

<body>

</body>
</html>

So this gives us a boilerplate for an html page in our new WordPress custom theme. Now what we need to do is put some code in here to make this dynamic for WordPress to populate. Lets start with the page title. This typically goes inside the <title></title> tags. Lets make that line look like this:


<title><?php wp_title(); ?></title>

The <?php ?> tells the server that you’re going to be writing some PHP code between the tags. What we are doing is calling a function built into WordPress that gets the page title. As we move along here we’re going to be calling a lot of functions that pull various content to our page from the WordPress database.

Lets add some more code – I’ll explain what each line does:

After the <link rel="profile" href="http://gmpg.org/xfn/11" /> – drop a line and add:


<?php wp_head(); ?>

This tells WordPress to bring in all the style sheets, RSS links and other information into the head of your document.

Between the body tags lets add the site title which will link to the home page and the site description functions. You do these by adding the following code:


<h1 class="site-title"><a href="<?php echo esc_url( home_url( '/' ) ); ?>" title="<?php echo esc_attr( get_bloginfo( 'name', 'display' ) ); ?>" rel="home"><?php bloginfo( 'name' ); ?></a></h1>
<h2 class="site-description"><?php bloginfo( 'description' ); ?></h2>

And while we’re at it – lets add the footer hook. You can customize these header and footer hooks, but for now they will bring in the admin bar so you can quickly get back to the admin interface if you need to. Under what we just added ad this line:

<?php wp_footer(); ?>

That’s it! So lets look at all of our code so far:


<!DOCTYPE html>
<html dir="ltr" lang="en-US">
<head>
<meta charset="UTF-8" />
<title><?php wp_title( '|', true, 'right' ); ?></title>
<link rel="profile" href="http://gmpg.org/xfn/11" />
<?php wp_head(); ?>
</head>

<body>
<h1 class="site-title"><a href="<?php echo esc_url( home_url( '/' ) ); ?>" title="<?php echo esc_attr( get_bloginfo( 'name', 'display' ) ); ?>" rel="home"><?php bloginfo( 'name' ); ?></a></h1>
<h2 class="site-description"><?php bloginfo( 'description' ); ?></h2>
<?php wp_footer(); ?>
</body>
</html>

You may now go to WP-Admin->Appearance->Themes and activate your theme. Click on “Visit Site” and you should see our basic page being displayed! There are no styles or anything fancy, but its working.
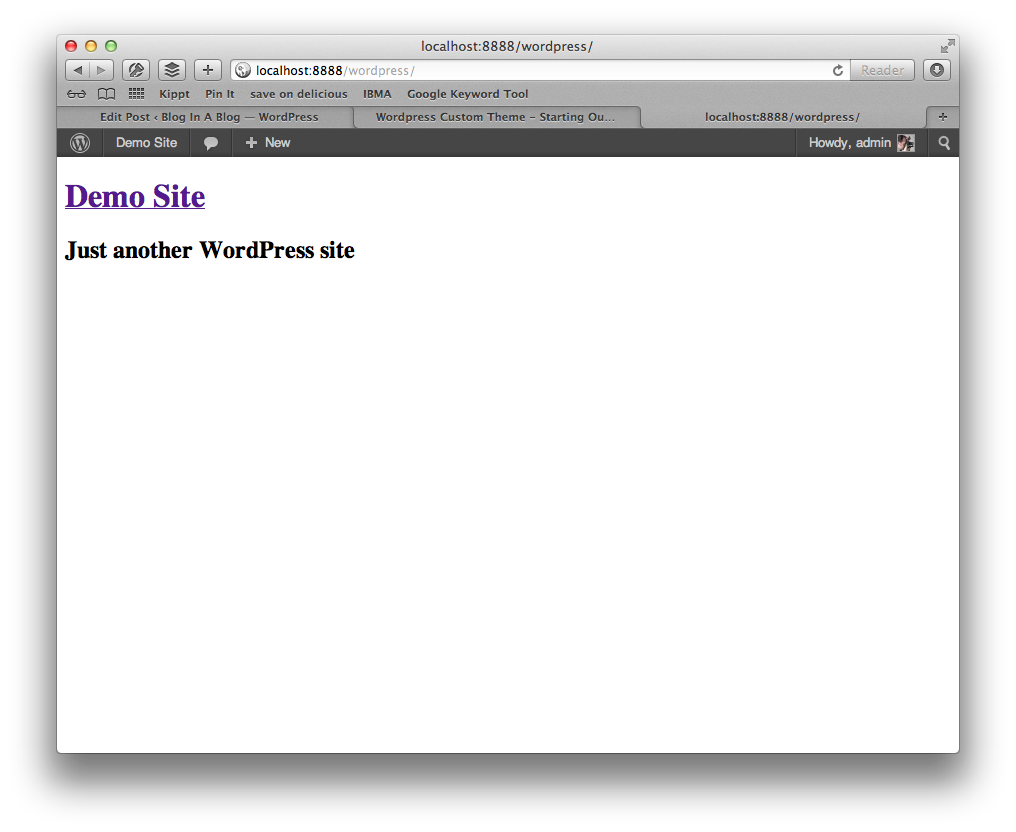
wordpress custom theme

Pretty cool huh? So what happened? When you go to your website, WordPress pulls files from a theme and populates content where it is asked to. We have no blog posts or pages yet – we’ll get to all the fancy stuff, but for now we’ll keep this bite-sized and say that we are now building our theme!

header.php and footer.php

One thing we need to do now is separate the header and the footer from this index.php file. We don’t want to have code duplicated all over our website, so we’ll put these in separate files and tell index.php to include them. We’ll do this with other page templates as well which is important. If we want to make changes, and we will, we only have to find the header and footer files. We don’t have to go through every file to change code. This is good coding practice. Its easy to do. Open a new file and cut and paste everything from the top of index.php all the way down to the close of the h2 tag we put in. Paste this into your new file and save it as header.php – then cut from <?php wp_footer(); ?> to the end of the index.php file. Paste this code into a new document and save it as footer.php –

Then go back to index.php and delete everything if its still there. Write the following code into index.php:


<?php

get_header();
?>

<!-- Page content will go here -->

<?php

get_footer();

?>

Save all the files and check your WordPress custom theme – nothing will look different really, but everything should work. We added a page comment that simply acts as a reminder when we go into the next section of where we should put our code.

Noticed I created the document first and then split it up. I like to work this way because its easier to think of the document as a whole rather than spread out over 3 separate documents. I like to make sure there are no errors first.

Typically in a WordPress site, the header and the footer stay the same on every page – that’s why we’ve split them like this.

In the next tutorial, we’ll start adding blog content! Stay tuned!

WordPress Theme Structure

Understanding basic WordPress theme structure is our first step in learning how to build a custom WordPress theme.

WordPress keeps all of the content files organized and separated from all the code that drives the content management side of things. This is nice because once you learn how this works, its makes it easy to make themes.

WordPress Theme Structure: The Bones

In your WordPress site folder you should find a folder called “wp-content”. This is where WordPress keeps themes, plugins, files and anything that is unique to your specific website. Inside the “wp-content” folder you’ll see a folder called “themes”. As you are probably guessing by now, this is where we will put our new theme that we are creating. You will see folders for all of the installed themes currently on the site. We can now begin by creating a folder for all of our theme files. If you would like – go ahead and create a folder called “custom-theme”. Notice that I used a dash instead of a space. This is actually a big deal when you’re working on any web server. Use letters and numbers only. Don’t use spaces. If you’re theme is two or more words like we just created, use a dash instead of a space. Spaces create problems for URLs.

Before we continue, lets look at a theme already in this folder so we can see how WordPress theme structure works.

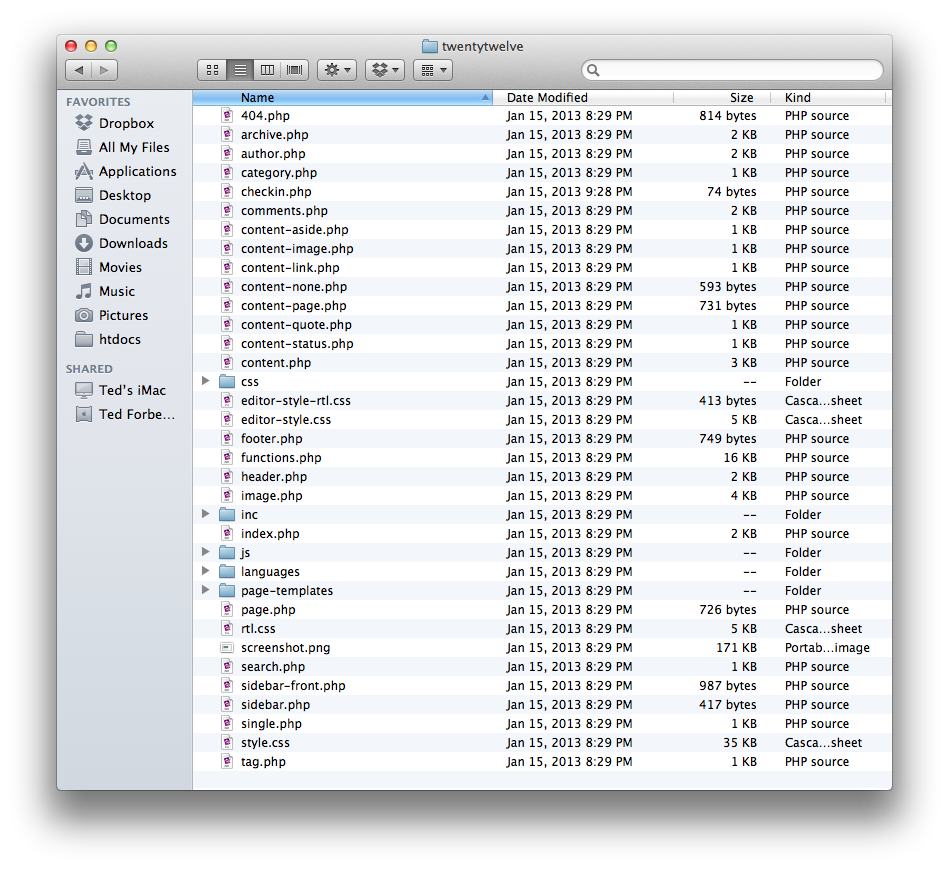
If you open up the “twentytwelve” folder, we can look at what the various files do in a WordPress theme. Twentytwelve comes with WordPress. Its fairly advanced, well written and well organized. Lets learn a few things from this.

If we look in this folder, there are a few key files that stand out that we need to know about.

wordpress theme structure

What we see here are some folders and a ton of PHP files, JS files and CSS files. These files are mostly templates and extras that tell WordPress how to render the look and behavior of your website.

There are a few key files in the WordPress theme structure that are important for us to look at first.

style.css

The first one we need to look at is the style.css file. This file is required of all WordPress themes. You can use other stylesheets, but WordPress looks at this one to determine the name of your theme and other information. If we open this file, at the top you will see:

/*
Theme Name: Twenty Twelve
Theme URI: http://wordpress.org/extend/themes/twentytwelve
Author: the WordPress team
Author URI: http://wordpress.org/
Description: The 2012 theme for WordPress is a fully responsive theme that looks great on any device. Features include a front page template with its own widgets, an optional display font, styling for post formats on both index and single views, and an optional no-sidebar page template. Make it yours with a custom menu, header image, and background.
Version: 1.1
License: GNU General Public License v2 or later
License URI: http://www.gnu.org/licenses/gpl-2.0.html
Tags: light, gray, white, one-column, two-columns, right-sidebar, flexible-width, custom-background, custom-header, custom-menu, editor-style, featured-images, flexible-header, full-width-template, microformats, post-formats, rtl-language-support, sticky-post, theme-options, translation-ready
Text Domain: twentytwelve

This theme, like WordPress, is licensed under the GPL.
Use it to make something cool, have fun, and share what you've learned with others.
*/

This is the info that WordPress will use to display your theme in the theme selection page. If you don’t have this information in the style.css file – WordPress won’t see your theme.

screenshot.png

Also, on the theme selection page, WordPress displays a theme preview thumbnail. This is the screenshot.png file. Its optional, but when you’re done designing your theme, you can take a screenshot, save it as a png file called screenshot.png and WordPress will display this on the theme selection page.

functions.php

Another important file is the functions.php file. This file is used to write PHP code that can customize aspects of your site. This can get a bit advanced and you’ll need to understand some PHP to work with this, but its very powerful and important to highly customized themes.

Other Essential Files

Most of the other files here are page template files. If you open one of them (index.php for example), you’ll see a line of PHP code near the top that says get_header() and a line at the bottom that says get_footer(). Note that there is also a header.php file and a footer.php file. WordPress knows to combine these files inside a template.

This is done for consistency. Generally on a website, the header stays the same and so does the footer. This keeps the code from repeating itself in every file you create. If you want to change something, you only have to do it in one place. This is clean coding practice.

So that is the basic WordPress theme structure. This is what we need to understand to build a basic theme. In the next post, we’ll start our first theme. And, you probably have guessed, we’ll start by building these elements.

Create A WordPress Theme

Create a WordPress Theme

I thought it would be fun to show you how to create a WordPress theme. I thought the process would be fun to outline here as I can share it with others who would like to know how this is done. Before we get going, there’s a few things we should establish.

WordPress is a very powerful content management system. This is good because it gives you a great deal of flexibility in designing a highly unique website. The downside of this is that its time consuming and difficult if you’ve never done it. I’ll be splitting this whole process over a series of posts and will document the whole thing here for you.

If you don’t have the patience or you just need some tweaks done to an existing theme, you might consider developing a child theme. Child Themes allow you to make basic changes to other themes with very minimal effort. In a child theme you only write the changes you want for your main theme. WordPress knows to pull anything you don’t include from the parent theme so this makes it very simple if you only need some small changes.

But if you are willing to take the plunge, this can be a great experience and you’re sure to learn something as we go along. I will show you how to create a WordPress theme.

Create a WordPress Theme – Understanding WordPress

Before we begin to create a WordPress theme – I think its important to understand how WordPress works in general. This will help you with your design, wire framing, and overall concept.

Pages and Posts

The main building blocks of any WordPress site are the concepts of Pages and Posts.

Pages are what they sound like. They are just static pieces of content that usually sit in the main navigation of your website. The idea of pages is that they aren’t related to one another in any specific way.

Posts on the other hand are the heart of your blog. Posts are canonical by nature – this means that they are associated with dates and usually run in order of creation starting with the most recent. Think of this like a dairy or journal. Keeping a website up to date means you’re creating mostly “post” types of content. It keeps your site fresh, but the challenge is getting it all organized so visitors can find your information. WordPress gives us some tools for this in post formats, categories and tags. Content creators can use these tools to group content and make things easy to find for the site visitor.

WordPress now also supports custom content types. This becomes more advanced and it is useful. However – I do recommend that before you start setting up custom content types, ask yourself if you can get the same result simply using posts and pages.

So think of it like this – as we create a WordPress theme, Pages are pillars of your website with general information. Posts are content that gets created frequently and constantly. Posts can be sorted in different ways so defining categories and tags is a great way of separating and organizing this type of content.

What You Need To Begin

I like to keep my tools simple. You’ll need a decent code editor. I like TextMate personally, but you could use something like Coda or BBEdit as well. Use a code editor and not a plain text editor as there are better features including colored code text.

You’ll probably want to set WordPress up running locally on your computer as well. Its a pain to constantly upload files to a server so this is a faster way to work.

When you do want to upload files to the web host, you’ll want a decent FTP program for doing this. My personal preference is Transmit by Panic Software.

Other than that you’re ready to go!

Coding Langages

I’ll be walking you through this process, but most likely you’ll want to have a basic understanding of HTML, CSS, Javascript and PHP. WordPress uses lots of custom functions which end up being almost its own coding language. We’ll be learning this as we go.

So get ready! In the next part, I’ll discuss how themes are structured and we’ll start on our first theme!

Customizing A WordPress Theme

Customizing A WordPress Theme

Customizing a WordPress theme is generally on the wish list of anyone who is using WordPress to power their website. Most people hack into the theme files and try to make modifications to get things to look the way they want them. While this seems to be the way to do this it creates a secondary problem. Often times theme authors (including WordPress for its own default themes) will issue theme updates. If you’ve made any changes, the update breaks them and replaces them.

For this reason, WordPress uses a system called Child Themes. As the name implies, Child Themes are dependent on an installed Parent Theme. This might seem confusing, but its a great, simple way to make modifications that will be safe from future updating. Child Themes are a very simple concept and easy to write.

Lets say you’ve found a great theme, but there’s some simple thing driving you nuts. Perhaps you don’t like the font. Maybe the post title text is the wrong color. You don’t want the site to say “powered by WordPress” in the footer. The simplest way to fix this is by writing a Child Theme. Lets take the last example of removing the “powered by WordPress” text on the bottom of every page.

Customizing a WordPress Theme With Child Themes

Create a folder on your FTP server in wp-content/themes/ and name it what ever you like. I usually name it after the website to keep it clear.

Create a file in this folder called style.css – this is important. The file must be called “style.css”.

Open this file and paste the following – make changes where noted:

/*
Theme Name: The name of your child theme - could be anything
Theme URI: The URL for your website - if you're not distributing this child theme this isn't important
Description: Child theme for the Twenty Twelve theme
Author: Your Name
Author URI: A link to your website
Template: twentytwelve
Version: 0.1.0
*/

The important lines in here are the Theme Name and the Template. The Template must be the proper name of the parent theme or this won’t work.

Below this, paste the following code:

@import url("../twentytwelve/style.css");

This tells WordPress to bring in the stylesheet of the parent theme. Now any CSS you write in this file will override the Parent Theme styles. You could completely rewrite the stylesheet – if that’s what you want to do, skip the import line, but this tutorial is for people who want to make small changes.

You now have a Child Theme set up – congratulations! Go back to the WordPress Admin and activate your new Theme.

So how do you start making changes? For CSS styles, add styles to the style.css file we just created. These will override the parent styles.

For template changes, copy the Parent Template into our new Child Theme folder and make your changes there. Because WordPress knows this is a child theme, it will override any parent template files with files in this folder. We want to take out the “powered by WordPress” statement, so copy the footer.php file from the twentytwelve them into your new child theme folder. After you’ve copied this file, make changes to the file in our new Child Theme. WordPress will ignore the old one.

If you open the new footer.php file you copied, you should see:

<?php
/**
* The template for displaying the footer.
*
* Contains footer content and the closing of the
* #main and #page div elements.
*
* @package WordPress
* @subpackage Twenty_Twelve
* @since Twenty Twelve 1.0
*/
?>
</div><!-- #main .wrapper -->
<footer id="colophon" role="contentinfo">
<div class="site-info">
<?php do_action( 'twentytwelve_credits' ); ?>
<a href="<?php echo esc_url( __( 'http://wordpress.org/', 'twentytwelve' ) ); ?>" title="<?php esc_attr_e( 'Semantic Personal Publishing Platform', 'twentytwelve' ); ?>"><?php printf( __( 'Proudly powered by %s', 'twentytwelve' ), 'WordPress' ); ?></a>
</div><!-- .site-info -->
</footer><!-- #colophon -->
</div><!-- #page -->

<?php wp_footer(); ?>
</body>
</html>

Simply remove the lines that read:

<?php do_action( 'twentytwelve_credits' ); ?>
<a href="<?php echo esc_url( __( 'http://wordpress.org/', 'twentytwelve' ) ); ?>" title="<?php esc_attr_e( 'Semantic Personal Publishing Platform', 'twentytwelve' ); ?>"><?php printf( __( 'Proudly powered by %s', 'twentytwelve' ), 'WordPress' ); ?></a>

You could replace those lines with something else if you want – I usually add a footer menu here so I can link to things like privacy policies, but you could leave it blank as well.

So that’s it! Next time WordPress updates the Twenty Twelve theme you won’t start seeing “powered by” again because your new Child Theme will remain untouched.

Chances are you’ll be making further modifications which is great. If these files were overwritten you’d loose them all which is the whole purpose of using a Child Theme.